| General Information | Wiki Principles & Practices | Accounts | EyeWiki Editors |
|---|---|---|---|
| Articles | Citations and Plagiarism | Editing Articles | Adding Images and Videos |
General Information
What is EyeWiki?
- EyeWiki is an online encyclopedia about eye disease, diagnosis and treatment and is written by eye physicians and surgeons on a wiki platform like Wikipedia. Qualified ophthalmologists may contribute and edit content subject to the terms and conditions of EyeWiki.
Who is EyeWiki for?
- The primary audience is ophthalmologists. Articles are written assuming that the reader has a comprehensive understanding of the clinical field.
- The secondary audiences are others in the eye care field, physicians in other specialties as well as patients and the public. Note: As a Wiki platform all articles on EyeWiki are available to anyone to read online.
Who can contribute to EyeWiki?
- Registered account holders who are ophthalmologists or ophthalmologists-in-training, from PGY-1 on.
- Since you are not an ophthalmologist, you will not be able to edit EyeWiki pages. However, you may be recognized as a contributor by an ophthalmologist who agrees to sponsor you.
Who publishes EyeWiki?
- EyeWiki is a service of the American Academy of Ophthalmology.
Wiki Principles and Practices
What is a wiki platform and why do I need to know?
- A wiki is not like other publishing platforms such as journals. It’s important to understand wiki platforms and principles especially if you want to contribute to EyeWiki, so that you know how content is added or edited and how contributors are recognized.
- A wiki is a collaborative tool that allows a community to contribute and modify one or more pages of materials. On EyeWiki these are articles.
What does wiki mean?
- The term comes from the word wiki wiki, which means fast in Hawaiian.
How does a wiki platform work?
- Wikis are collaborative in nature and facilitate community-building to keep content current.
- Authorship is less important on a wiki platform since it relies on the community to keep content up to date.
- Articles are not formatted as they would be for a journal submission e.g., instead of including creating a standalone article with complete background information and/or history, inter-article links are used to present information to the audience.
- A wiki is a web page with an open-editing system where content is added in real time by any community member.
- Anyone may edit any wiki page as soon as it is added to the platform.
- On a wiki platform you should expect others to edit your content.
How are contributors recognized on a wiki?
- Many wiki platforms do not list contributors at all e.g., Wikipedia.
- Since articles change over time and may even be merged with other articles, authors are considered contributors and thus, author order is not tracked.
- The ophthalmologist who started the article is listed in the field titled “Article Initiated By.” If more than 1 name is listed in this field it will automatically revert to alpha order by username. This field is for listing ophthalmologists.
- The “All Authors and contributors” section is where ophthalmologists may add non-ophthalmologist contributors such as medical students and researchers, and other ophthalmologists who have contributed but have not made edits to the page. Any other ophthalmologists who revise or edit the article will automatically be added to this field.
What are Discussion pages used for in EyeWiki articles?
- Discussion pages, also known as Talk pages can be used to collaborate on articles by entering comments to create a thread or conversation.
- Get started by clicking the Discussion link, available on any article page and add your comments with simple formatting to get your thread going.
- It is customary to sign and date your comments by entering 4 tilde ~ characters. This will automatically add your username and a time stamp.
How do I find out more about a listed contributor?
- Go to the contributor’s user page, by clicking on their name, listed in blue. The user page will list geographic location, professional affiliation, financial disclosures, subspecialty, degrees, residency program or school. If the contributor’s name is listed in red, they do not have a registered account.
How do I contact another EyeWiki contributor?
- Click on the registered community member's blue highlighted name to access their user page. Names in red are not registered on EyeWiki.
- At the bottom of their user page check the blue menu bar for "Email this user."
- If this option is present, you may use it to send them an email through EyeWiki.
- If the link is not present, the user has not enabled email from other EyeWiki users.
What is the Watchlist and how do I manage it?
- Registered EyeWiki users can create a Watchlist so that they are automatically notified when changes occur to articles on their list.
- Note: If you edit an article, it will automatically be added to your watchlist
- Watch or unwatch an article by clicking on the “Watch/Unwatch” link at the top of the article page.


- View recent changes made to the pages on your watchlist by clicking the "Watchlist" link in the top right of EyeWiki pages.
- Make changes to your Watchlist by clicking the "Watchlist" link in the top right of EyeWiki pages.
Accounts
Do I need an EyeWiki account?
- If you are an ophthalmologist or ophthalmologist-in-training (from PGY-1 on) who wants to contribute to EyeWiki – Yes.
- If you are not an ophthalmologist e.g., medical student, researcher, and you have assisted a sponsoring ophthalmologist with research, writing or editing content – Yes.
- Note: Non-ophthalmologist accounts are read-only and are used to properly recognize contributions.
- If you simply want to read EyeWiki articles and don’t plan to contribute – No.
What types of accounts are available?
- Accounts with editing rights for ophthalmologists only.
- Accounts without editing rights for medical students and other eye care professionals who have a sponsoring ophthalmologist.
- Note: Before approval EyeWiki staff will contact the sponsoring ophthalmologist to verify the partnership.
How long does it take to get an account?
- You MUST create your user page before your account can be reviewed and approved.
- All accounts go through a review and approval process, so it can take up to 3 days for account approval and longer during holidays.
- You will not be able to add or edit content until your account is approved.
How do I set up an account?
- Visit the Create Account page.
- Set up your username and password
- Note: Your Username/login must be set up as case-sensitive Firstname.Lastname
- Fill out your user page/account profile completely. Your account request is not valid without a complete user page.
- User page/account profile information required for non-ophthalmologists:
- Full name (Your name as listed here will be how your name is presented in articles you contribute to)
- Job title or field of work
- Name of sponsoring ophthalmologist registered on EyeWiki who we will contact to verify sponsorship
- Location, e.g. San Francisco, CA, USA
- Affiliation, e.g. practice and/or educational institution
- Financial disclosures. Declare “none” if you have no financial disclosures to make
- User page/account profile information required for ophthalmologists or ophthalmology residents in training:
- Full name (Your name as listed here will be how your name is presented in articles you contribute to)
- Ophthalmology subspecialty, e.g. Comprehensive, Retina
- Degree type, e.g. MD, DO
- Location, e.g. San Francisco, CA, USA
- Affiliation, e.g. practice and/or educational institution - name the specific institution
- Financial disclosures. Please declare “none” if you have no financial disclosures to make
Why does my username/login need to be formatted as Firstname.Lastname?
- Your login/username is how other community members find you to list you as a contributor.
- If your name is Adam Smith and your username is bugsbunny, they won’t be able to find you amongst the thousands of registered accounts.
What is the user page for?
- The user page is how you let other people in the EyeWiki community know about you. This is your public profile.
- Instead of listing author information and affiliations with an article they are included on your user page, which is linked to any article you contribute to.
Can I set up accounts for my co-contributors?
- No. Each contributor needs to set up their own account.
I’m a resident who started my EyeWiki account as a medical student. How do I upgrade my account?
- Contact eyewiki@aao.org to have your account permissions modified to include editing rights.
How do I update and maintain my public profile/user page and EyeWiki account?
- Log in to EyeWiki, then click on your name in the upper right part of any page to access your public profile/user page
- Select “Edit with Form” make your changes and SAVE the page.
- To update your account preferences, click on “Preferences” in the upper right part of any page.
- Here you can change your password, your registered email address, and your email options.
I’m having trouble logging in to my account. How do I login properly?
- If you encounter issues with EyeWiki, please follow these steps to confirm that you can log in properly:
- Go to the main page of EyeWiki and click the Log in link at the top right hand corner of the page
- Click the blue Accept button at the bottom of the page

- Check off the ‘Keep me logged in’ checkbox to reduce potential lost work from session expiry.
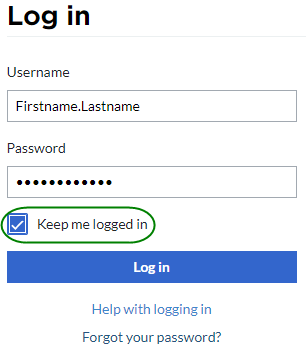
- Enter your case-sensitive username: Firstname.Lastname and your password
- If successful, your username will appear at the top of page

- If login was not successful, your username does not appear at the top or there was an error, please send a screenshot(s) describing the issue noting the page title, date and time of the occurrence to eyewiki@aao.org
- Updating your browser version, clearing browser cache, closing multiple browser tabs with open EyeWiki sessions, saving page changes often and/or logging out and back in again may help reduce further issues with site issues, e-mail address reconfirmation or expired session login verification.

EyeWiki Editors
I’m an EyeWiki editor. Where can I find instructions and my article assignments?
- Login in to EyeWiki
- Go to your section’s Portal by clicking on “My Portal” at the top of the page next to "Recent Changes"
- You can find instructions in the Quick-Start Guide for Editors linked to your section Portal
- To find your own article assignments, sort the Portal article table by “Assigned Editor (portal member)” or use the filter
- Also, find your article assignments on your Talk page between your Name (after logging in) and Preferences
- To edit and make changes to articles use the instructions below
Where can I find a list of EyeWiki Editors?
- Visit the EyeWiki editorial board page to find out more about the site's editors.
Articles
Does EyeWiki accept new articles?
- Current editorial policy requires that any new articles on the site first go through a submission and approval process.
- If you believe you have a valuable idea for a new EyeWiki article:
- First review the existing articles to see if a there are articles that already cover the subject. You can do this by performing a thorough search using various related key terms.
- If you find a pre-existing article, edit it to include your own input. You will be automatically recognized as a contributor to that article.
- You may submit a request for a new article after carefully reading the new article instructions and policies.
Who can submit a request for a new article?
- Proposals for new articles are accepted by request from ophthalmologists or ophthalmologists-in-training with a registered EyeWiki account.
- Please update the existing article(s) and participate in community efforts to keep EyeWiki up to date. You will be automatically recognized for your contributions to that article.
- If you do receive approval for a new article, do not repeat information from those articles in the new article. Instead create links to existing articles in keeping with wiki principles.
Why should I edit an article instead of creating a new article?
- Since EyeWiki covers most topics in ophthalmology we encourage you to review, revise, and update what is already here.
- Editing and improving what is already on EyeWiki is enormously valuable and in keeping with wiki principles, which emphasize the involvement of a community of professionals to keep EyeWiki up to date.
- There is no such thing as the perfect wiki article, and all articles may benefit from further edits and new content.
- You will automatically be added as a contributor to an article when you edit it. You may also add non-ophthalmologists working in the eye care field who have assisted you as contributors.
- Revised articles are eligible for submission to the U.S. Residents & Fellows Contest and the International Contest.
What are the requirements for a new EyeWiki article?
I saw a mistake in an EyeWiki article. What should I do?
- If you are an ophthalmologist or ophthalmologist-in-training, join the EyeWiki community by signing up for an account. Then you may edit the article.
What is the article review status?
- The article’s review status is used by EyeWiki editors to indicate that they have reviewed and signed off on the article.
- When an article is first added to EyeWiki the status will be listed as “Update Pending” until an assigned EyeWiki editor has reviewed the article.
- “Up to Date” means that an EyeWiki editor has determined that the quality and accuracy of the content is generally high, and the topic is covered in adequate detail.
Are EyeWiki articles peer reviewed?
- No. EyeWiki functions as any other wiki, and as such content will be amended freely over time by multiple approved EyeWiki contributors. The EyeWiki editorial board reviews and edits articles on a regular basis to ensure accuracy and currency, but this oversight is not akin to a rigorous peer-review process.
What language is used for EyeWiki articles?
- All EyeWiki articles are written in U.S. English.
Does EyeWiki accept guest posts?
- No. EyeWiki articles are only accepted from ophthalmologists with registered accounts.
Citations and Avoiding Plagiarism
It is critical to ensure articles are properly cited to avoid issues related to plagiarism. Specifically, materials that you contribute to EyeWiki must be your original composition. The posting of materials copied from another source without permission will not be allowed. If you have any questions regarding what is appropriate, please contact us.
Can I use materials e.g., images, videos, tables etc. from other sources on EyeWiki?
- If you have the appropriate copyright permission, you may use images, videos, and materials from other sources.
- When you add content, you guarantee to EyeWiki that you have obtained the appropriate permissions.
- You must also cite the materials as requested by the copyright owner.
Can I use Artificial Intelligence (AI) for EyeWiki contributions?
- Contributors may use AI (e.g., generative AI models) in scientific writing solely to improve readability and language of the work, not to replace essential research and writing tasks.
- AI must be used with human oversight in order to avoid incorrect, incomplete, or biased output.
- AI cannot be listed as a contributor.
- Contributors are accountable for the contents of their work, and each contributor is responsible for ensuring the accuracy and integrity of the work.
- Contributors must ensure that their work is original and does not infringe on third-party rights.
What reference format should I use on EyeWiki?
- The standard reference style to use is based on the AMA Manual of Style, which states that references serve 3 primary purposes—documentation, acknowledgment, and directing or linking the reader to additional resources. Authors bear primary responsibility for all reference citations. Included here are examples of the style of various citations in a reference list. For additional examples and more information, refer to the AMA Manual of Style, 10th edition (New York: Oxford University Press; 2007).
- If you add references and citations properly they will automatically populate as end notes.
- Here are guidelines with regard to reference formats and minimum acceptable data.
Journals:
Print: Author(s). Article title. Journal Name. Year;vol(issue No.):inclusive pages.
Online: Author(s). Article title. Journal Name. Year;vol(issue No.):inclusive pages. URL. Accessed [date].
Books:
Print: Author(s). Book Title. Edition number (if it is the second edition or above). City, State (or Country) of publisher: Publisher’s name; copyright year.
Online: Author(s). Book Title. Edition number (if it is the second edition or above). City, State (or Country) of publisher: Publisher’s name; copyright year. URL. Accessed [date].
Web Site:
Author (or, if no author is available, the name of the organization responsible for the site). Title (or, if no title is available, the name of the organization responsible for the site). Name of the Web site. URL. Accessed [date].
Selected Examples
Journals:
Slade SG. The use of the femtosecond laser in the customization of corneal flaps in laser in situ keratomileusis. Curr Opin Ophthalmol. 2007;18(4):314-317. [journal names abbreviated per PubMed; journal name in italics]
Kezirian GM, Stonecipher KG. Comparison of the IntraLase femtosecond laser and mechanical microkeratomes for laser in situ keratomileusis. J Cataract Refract Surg. 2004;30(4):804-811.
Tran DB, Sarayba MA, Bor Z, et al. Randomized prospective clinical study comparing induced aberrations with IntraLase and Hansatome flap creation in fellow eyes: potential impact on wavefront-guided laser in situ keratomileusis. J Cataract Refract Surg. 2005;31(1):97-105. [up to 6 authors listed; if more than 6, list first 3 plus “et al”]
Books:
Buratto L, Brint S. Custom Lasik Surgical Techniques and Complications. Thorofare, NJ: Slack; 2003:3–8.
IntraLase FS™Laser Training Manual. Santa Ana, CA: Abbott Medical Optics; 2006:1–28.
Leigh RJ, Daroff RB, Troost BT. Supranuclear disorders of eye movements. In: Glaser JS, ed. Neuroophthalmology. Philadelphia, PA: Lippincott Williams & Wilkins; 1999:351–363.
Presentations:
Goldman D, Koreishi A, Yoo S, et al. Sutureless anterior lamellar keratoplasty (SALK) performed with a femtosecond laser. Federated Societies Scientific Session. Washington, DC: Eye Bank Association of America and the Cornea Society; 2006:15.
Academy Materials:
American Academy of Ophthalmology. Minimizing Transmission of Bloodborne Pathogens and Surface Infectious Agents in Ophthalmic Offices and Operating Rooms. Clinical Statement. San Francisco: American Academy of Ophthalmology, 2002.
Trobe JD. The Physician’s Guide to Eye Care, 3rd ed. San Francisco: American Academy of Ophthalmology; 2006.
Wilson FM, ed. Practical Ophthalmology, 6th ed. San Francisco: American Academy of Ophthalmology; 2009.
Web Site:
American Academy of Ophthalmology. Saccades and fixations. https://www.aao.org/image/saccades-fixations Accessed May 27, 2020.
Dixit S. American Academy of Ophthalmology. Fallen beauty, traumatic Iridodialysis. https://www.aao.org/image/fallen-beauty-traumatic-iridodialysis Accessed April 29, 2021.
Feldman BH. Cataract. EyeWiki. https://eyewiki.aao.org/Cataract. Accessed June 21, 2011.
How do I get permission for images, videos, text etc. from the American Academy of Ophthalmology?
- If you would like to use images or text of the American Academy of Ophthalmology, please complete and submit this Request for Permission to the address listed in the form.
- The exception to this is the use of images from the Academy's Image Collection, which is pre-approved for use on EyeWiki as long as images are properly credited to the Academy. Note: This collection is only available to Academy members.
How do I get permission to reuse an image or video from EyeWiki?
- Review the caption and citation on content you wish to use.
- If the content is from the American Academy of Ophthalmology, follow the instructions above.
- If the content is from a publisher or individual, contact them.
- If no source is indicated, open the desired content file to see who uploaded the content, and contact them by clicking on their username. This will take you to their user page, where a public email address may be listed.

How do I cite my own contributions to Eyewiki?
- This is the recommended format for citing an article you have contributed to. The date is important because articles will change over time as the community updates them.
- Burkat CN, Contributor. Sebaceous Carcinoma. American Academy of Ophthalmology, EyeWiki. https://eyewiki.aao.org/Sebaceous_carcinoma. Accessed February 16, 2024.
- On EyeWiki authors are considered contributors and since articles will change over time author order is not tracked.
How do I cite an EyeWiki Article?
- This is the recommended format to cite an EyeWiki article you want to use as a reference.
- Sebaceous Carcinoma. American Academy of Ophthalmology, EyeWiki. https://eyewiki.aao.org/Sebaceous_carcinoma. Accessed February 16, 2024.
- Over time there will be many contributors, so it is not necessary to attribute an article to particular person.
- As an encyclopedic resource, EyeWiki articles should be considered as secondary or tertiary sources.
Editing Articles
How do I upload my article or my changes to an article?
- There is no “upload” feature on a wiki platform. Instead, you will be adding your content live and online using the editing tools described below.
What is a Meta description and how do I add one to an article?
- A meta description is a tag that summarizes a webpage's content. It's a snippet of text, often around 160 characters long and is used to optimize search engine results.
- Meta descriptions do not appear in EyeWiki articles, instead they appear under the article title in search engine results.
- Add a meta description to an EyeWiki article by using the “Edit with Form” link and going to the Meta Description field.
How do I edit articles?

- There are 3 different editing links listed at the top of every article.
- For all methods, click the Save button to retain your changes.
- Edit: This is the "visual editor" and offers the most user-friendly interface with options to format text and section headings, and to add links, images, citations and more.
- Edit with form: Use this link to add other contributors by listing their username in the All Contributors field. Note: Your name will be automatically added to the article, so you do not need to add it to the All Contributors field.
- Edit source: This is “wiki text” and will reveal source code and requires knowledge of special characters to format text and add links and images. Use this if you are comfortable with wiki editing practices and wish to use plain text. In wiki text section headings surrounded by equal signs define the heading levels. For example, one equal sign surrounding text denotes a top level section heading; two equal signs denotes a sub level and so on.
  = Disease Entity  =
  Add text here

  == Disease  ==
  Add text here

  == Etiology  ==
  Add text here
- A table of contents is automatically generated when more than three section headings are used. Article drafts can be updated incrementally without filling in all of the sections using Edit or Edit source as needed. Again, ensure you click the "Save changes" button to save your work.
- See Content Template Example for a full example and the tips below for more details on editing content in EyeWiki.
How do I add and reuse references and citations?
Note: If you properly add citations to an EyeWiki article, they will automatically populate as end notes.
- Using the visual editor (Edit link)


- Place your cursor where you want to cite a reference.
- Click "Cite" in the edit menu and then select "Basic" to add a new reference.
- To place a reference that you have already cited within the article choose "Re-Use."
- If the reference is new, type it into the text box.
- EyeWiki will automatically number or renumber the references and capture all the places where a reference is cited within the article.
- If the article is new place your cursor at the end of the article, where you want the reference list to appear. Click "Insert" in the edit menu and then select "reference list".
- Using wiki text (Edit source link
- Within the article, place your cursor where you want to cite a reference. Type the tag <ref> and then type your reference information. At the end of the reference information, type the tag </ref>. Do this for each citation.
- Place your cursor at the end of the article, where you want your endnotes to appear. Type the tag </References> and your references will appear in order as you entered them in the article. You will only have to do this once for the article.
- You can add multiple references for one citation by adding one after the other, each with their own REF tags. You can also name tags, and then reuse them as citations in your article with the <ref name ="tagname"> nomenclature.
- For more information, see [1]
How do I add links to other articles or to another website?
Note: In keeping with wiki principles, it is enormously important to create inter-article links to avoid overlapping or redundant content. There is no need to repeat information that is in another wiki article.
- Using the visual editor (Edit link)
- Highlight the word or phrase that will be the link e.g., Giant cell arteritis.
- Click on the link button in the Editor's menu. If there are existing EyeWiki articles with the phrase in the title, they will populate automatically.
- Choose the appropriate article.
- To link to an external website, type in the full address e.g., such as https://www.aao.org
- Click Done.

- Using wiki text (Edit source link)
- To link to an EyeWiki article type [[Page title|Link label]] where Link Label is hyperlinked text that would appear in the article, if you do not include Link Label, the name of the page title would appear.
- To link to an external website type [https://www.example.org Link label] where Link Label is text that would appear in the article, if you do not include the Link Label the words https://www.example.org would simply appear in the article.
Adding Images and Videos
Are there any pre-approved sources of images for EyeWiki?
- Yes. Use of images from the Academy’s Image Collection is pre-approved for use on EyeWiki as long as images are properly credited to the Academy according to the guidelines that you will find when you access this collection. Note: This collection is only available to Academy members.
How do I upload images and videos?
Note: When you add content to EyeWiki you guarantee to the American Academy of Ophthalmology that you have the appropriate rights to all the materials posted (including text, images, video, and audio). This means you own the copyright to the materials or have a license or permission to use the materials or the material resides on a third-party site that allows you to link to its content.
- Follow these instructions to upload images and videos to EyeWiki. You must upload files before you can add them to articles.
![]()
- Click on “Upload file” from “tool box" at the bottom of all EyeWiki pages.
- Click “Choose File” on the new page.
- Find the file on your computer and press “Open”.
- The name of the file will appear in this line, you can edit if you like.
- You can add a description of the file in this line and associated source.
- Click “Upload file”

Uploading an image (visual summary)

How do I add images to articles?
Note: You must upload images and videos to EyeWiki before you can add them to an article.

- Using the visual editor (Edit link)
- In Edit mode, place your cursor where you want to insert the image you have previously uploaded.
- Click on Insert on the menu bar; choose images and media.
- Choose your desired image by clicking on it.
- If you do not see your image, use the Search function.
- Select “Use this image.”
- Add a caption and credit line.
- Use the advanced tab to select a position for your image. Or you can drag the image on the page after it has been inserted into the article.
- Click Insert.
- Click Save.
- Using wiki text (Edit source link)
- Type [[File:Filename.jpg]] to use the full version of the file.
- Use [[File:Filename.jpg|200px|thumb|left|alt text]] to use a 200 pixel wide rendition in a box in the left margin with "alt text" as description.
How do I add a gallery of images?
Note: You may add a series of images in a gallery format for the purposes of showing disease stages or progression. You can also edit galleries with updated or additional images. See this example of a gallery.

- Using the visual editor (Edit link)
- Upload images that you want in your gallery series
- Position the cursor at the location of text where the gallery of images will be inserted
- Under the Insert menu click More then Gallery
- Enter a search term to find images in the series you uploaded. You may also search for the uploaded images by checking your Contributions at the top of the page
- Select the image and enter a caption, alternative text (to aid accessibility) or remove image as needed
- Continue clicking Add a new image and repeating the steps above for each image in the series
- Under the Gallery > Options tab, a caption for the whole gallery may be added and the display mode set to Slideshow under the drop down menu
How do I edit an existing gallery of images?
- Using the visual editor (Edit link)
- Find and select the pre-existing gallery element and click Edit
- Click Add a new image to add new images to the gallery
- Remove image(s) from the gallery by selecting the image(s) from the right panel, scroll to the bottom of the image detail screen and click the Remove Image button


How do I add videos (larger than 200 MB) to articles?
Note: Videos larger than 200MB must be linked to EyeWiki from YouTube. Videos smaller than 200MB can be uploaded to EyeWiki and linked to articles.
![]()

- Videos larger than 200 MB - Linking from YouTube
- Get the YouTube ID from the video on YouTube.com.
- Click "Edit source" on the page you want to add the video tube.
- Click on the location in the article where the video should appear.
- Add a line with the ID wrapped with the youtube tag.
- The YouTube video associated with the ID you entered will now be displayed on the page with its own player.
Source: YouTube. American Academy of Ophthalmology. Hypertension and the Eye. https://youtu.be/SUn8wTtvfL4 Accessed June 8, 2020.
How do I add videos (smaller than 200 MB) to articles?
Note: There are 3 ways to add videos locally that are smaller than 200MB. Videos larger than 200MB must be linked from YouTube. The permitted file types for video are avi, ogv, mp4, m4v, webm. Video files may be added with using one of the 3 edit links found in all articles: Edit with form, Edit source, or Edit.
- Using Edit with form
- Upload the video file via Edit with form for any article under the Local Videos section

- Using wiki text (Edit source link)
- Upload your video file.
- Go to the article where the video is to be inserted.
- Choose Edit source and click on the location of the content where the video is to be inserted.
- Enter the following template (either form is acceptable) as plain text in the body of the article. File page is the name of the video uploaded. Caption is the caption of the video.
- Take care not to embed the LocalVideo template in another template such as the InfoBox template as the video will be hidden on mobile devices.
{{LocalVideo|
|File page = Eyewiki_test.mp4
|Caption = Angiography blood flow
}}
OR
{{LocalVideo|File page=Eyewiki_test.mp4|Caption = Angiography blood flow}}
Sample of inserted video
Angiography blood flow
- Using the visual editor (Edit link)
- Upload your video file.
- Go to the article where the video is to be inserted.
- Choose Edit and click on the location of the content where the video is to be inserted.
- Choose Insert > Template and in the Add a Template dialog (see below), add fields: File page AND Caption with their associated values.
- Refer to screenshots below as a guide. Need more help? Please email eyewiki@aao.org
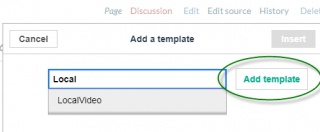
1. Add the LocalVideo template: enter LocalVideo in the search field and select Add template.
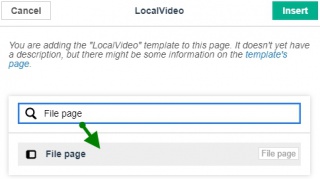
2. Add the File page field: enter File page and click on the grey box Unknown field to insert this new File page field. Then Add the uploaded video filename to the File page field: enter the uploaded video filename for the File page field.
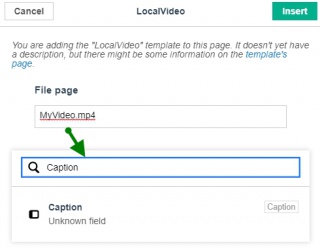
3. Click Add more information to add the caption field and caption of the video: add a Caption field and value just like the steps for the File page.

4. Once you have 2 fields: File page AND Caption with their associated values, click Insert to add the LocalVideo template.


