Slit Lamp Examination
All content on Eyewiki is protected by copyright law and the Terms of Service. This content may not be reproduced, copied, or put into any artificial intelligence program, including large language and generative AI models, without permission from the Academy.
Diagnostic Intervention
Description/Overview
The slit lamp is a stereoscopic biomicroscope that emits a focused beam of light with variable height, width, and angle. This unique instrument permits three-dimensional visualization and measurement of the fine anatomy of the adnexa and anterior segment of the eye. With the aid of hand-held lenses, the examiner can view the posterior segment as well. A gonioscopic contact lens allows for visualization of iridocorneal angle. The slit lamp is therefore a mainstay of the comprehensive eye examination, allowing optometrists and ophthalmologists to evaluate every anatomical compartment of the eye. However, this instrument should not be relegated to the specialist’s toolkit. Slit lamps are commonly available in emergency departments, and this device is an invaluable tool for the diagnosis and evaluation of common ocular complaints, ocular emergencies, and systemic disease. Although mastery of the slit lamp takes time, basic application to work-up common ocular complaints is a tractable goal for medical students, general practitioners, and emergency medicine providers alike. This article provides an overview of the basic operation of the slit lamp for all health care providers, medical students, and residents.
History and Development
Purkinje, in 1823 tried to develop a hand-held slit lamp by using one lamp to magnify the handheld lens with oblique illumination. De Wecker designed the first Ophthalmomicropcope in 1863. The predecessor of the modern slit lamp was developed in 1911 by the Swedish physicist and Nobel laureate Allvar Gullstrand in collaboration with Zeiss Optical Works[1][2]. Gullstrand used his invention to advance research into the structure of the cornea and astigmatism. In the 1930s, the Swiss inventor and ophthalmologist Hans Goldmann refined the Gullstrand slit lamp, ensuring that the convergence point of the light beam would coincide with the focal point of the microscope. Goldmann’s parfocal slit lamps were produced by the Swiss manufacturer Haag Streit beginning in 1958 and became the first commercially available slit lamps[3]. Apart from minor advances in illumination technology, such as the advent of LED light sources, these instruments are virtually identical to the modern day slit lamp. Incidentally, Hans Goldmann also developed gonioscopy prisms, which permitted visualization of the iridocorneal angle[4]. Later, David Volk developed lenses free from spherical aberrations for visualization of the fundus when placed in the slit lamp light path[5]. Together, these contributions allowed physicians to perform a complete diagnostic examination with the aid of the slit lamp and perhaps more importantly, for the patient to remain comfortably seated for the duration of this exam.
Indications
Anatomy of the Slit Lamp
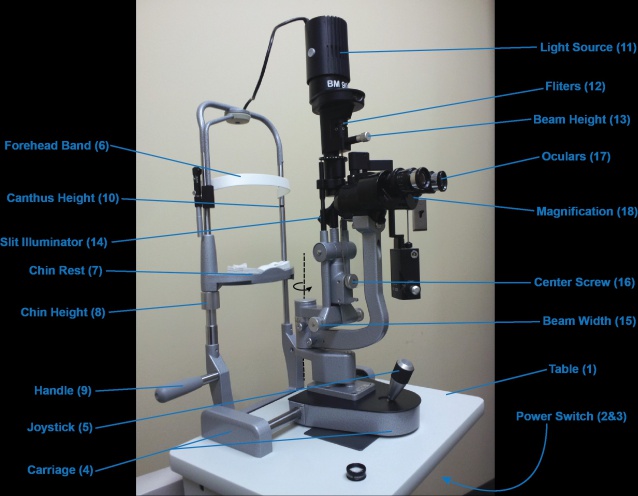
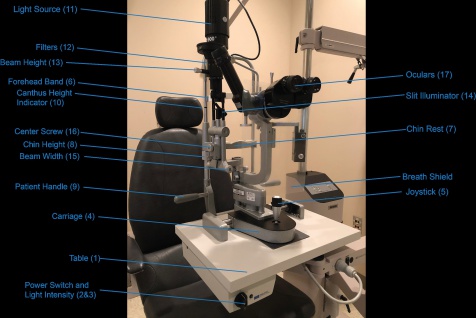
The standard slit lamp has four main parts: the base, the patient support frame, the illumination arm, and the viewing arm[6]. Each of these parts comprises several subcomponents (Figure 1):
A . Slit Lamp Base
- 1. Adjustable table
- 2. Power switch
- 3. Intensity Rheostat
- 4. Locking carriage (for coarse X-Y plane)
- 5. Joystick (for fine X-Y, as well as Z)
B. Patient Support Frame
- 6. Forehead Band
- 7. Chin rest
- 8. Chin height adjustment knob
- 9. Patient Handles
- 10. Canthus Height Indicator
C. Illumination Arm (on swivel)
- 11. Light Source
- 12. Illumination filters
- 13. Beam Height Adjustment
- 14. Slit illuminator
- 15. Beam width adjustment
- 16. Center screw
D. Viewing arm (on swivel)
- 17. Oculars
- 18. Magnification control knob
Procedure
Tips for Getting Started: General Operation
Positioning the Patient
- Before beginning your exam, ensure that the forehead band (6), chin rest (7), and handles (9) have been thoroughly cleaned with alcohol.
- Bring the base table (1) into position so that the patient can sit comfortably with his or her chin against the rest and grasp the handles.
- Adjust your own chair so that you can comfortably reach the oculars (17), noting that a disparity in the height of patient and examiner may necessitate adjustment of the exam chair as well.
- Adjust the ocular to fit your interpupillary distance. If you are wearing corrective lenses already or do not require correction, twist the eyepieces until they are set to plano, otherwise enter your prescription in the eyepieces.
- Ask the patient to sit upright so that his or her forehead is steadied against the forehead band (6). This step is crucial to ensure that the eye is within the focal range of the slit lamp, and must be maintained throughout the exam, so ensure that the patient is comfortable holding this position. The examiner should take measures to ensure his or her own comfort as well to conduct a patient, careful exam.
- Turn the chin height adjustment knob (8) until the lateral canthus is aligned with the canthal indicator, usually a black demarcating line on the patient frame (10). Sometimes it is difficult to obtain appropriate positioning. If a patient requires a wheelchair and cannot be transferred, push back the exam chair to maneuver a wheelchair behind the slit lamp table. In some circumstances limitations make standard slit lamp positioning difficult. In these cases, a handheld slit lamp can be used to complete the exam.
Positioning the Operator
- Routine operation should be conducted with the dominant hand on the joystick (5) and carriage (4) and the non-dominant hand on the slit width adjustment knob (15), allowing for fast adjustment of slit beam width as well as manipulation of the angle of the beam by swiveling the illumination arm.
- It is a standard convention to examine the patient’s right eye first followed by the left eye. The examiner might consider switching hands when examining the left eye, although this can be tailored to the comfort of the examiner.
Focusing
- Unlock the carriage and turn the power switch on (2).
- Aim the light beam toward a point on the skin for coarse focusing and slowly slide the entire carriage forward toward the patient. To minimize discomfort, avoid directing the beam into the patient's pupil. Instead, select a point on the nose or cheek for coarse focusing.
- As the illuminated area comes into focus, maintain the joystick in an upright position to preserve the full range of fine back-and-forth control during the examination. The vertical position of the beam and field of view can be coordinately adjusted upwards by turning the joystick clockwise and down by turning counterclockwise.
Illumination
- Intensity of light may be varied by adjusting a rheostat or intensity steps integrated into the power switch (3). Adjust the intensity to provide enough light for examination, but keep in mind that high intensity light will be uncomfortable for many patients especially if the pupils are dilated. A neutral density filter can also be used to reduce light intensity (12).
- The illumination arm sits on a swivel such that the beam can be directed from any direction in the horizontal plane 90° nasal and temporal to the microscope focal point.
- Beam width can be adjusted by turning a knob at the base of the illumination arm (15), allowing the examiner to appreciate depth and thickness of semi-transparent media such as the cornea, anterior chamber, and lens as well as light scattering through these media. This is particularly useful in evaluating pathologies that opacify these media.
- Beam height can be adjusted by turning a knob directly on the light source near the top of the lamp (13).
- Beam height and width can be adjusted to make measurements during examination; the dimensions of the beam can be read off these knobs in millimeters. Measurements can also be facilitated by varying the orientation of the slit beam, which can be adjusted through 12 clock-hours by turning the light source relative to the illuminator arm.
- Above the knob that controls beam height, a switch (12) controls several illumination settings including a red-free (green) filter to facilitate visualization of blood, a cobalt-blue filter for use with fluorescein, and a neutral-density filter for fundoscopy.
- If even, unfocused illumination is desired rather than a narrow beam, a diffuser can be swung up in front of the slit beam mirror. This is particularly useful for wide-field examination of the adnexa and ocular surface and for slit lamp photography.
Magnification
A magnification control knob sits near the oculars on the viewing apparatus (18). Most slit lamps offer stepwise magnification between 6X and 40X. Lower power (6X-10X) maintains a wide field of view is optimal for general examination. High power can be used to examine the fine structure of pathologic features identified at low power.
Uncommon adjustments:
A “center screw” on the illumination arms (16) allows for adjustment of the convergence point of the light beam independent of the microscopic focal point. Adjustment of this screw results in decentering, a loss of the parfocality between the illumination system and the viewing system. For most exams, this is undesirable and novice users should avoid adjustment of the center screw. For advanced operations, this feature can be useful to improve retroillumination or accentuate sclerotic scatter. Another feature on some lamps is column tilt, which allows the user to tilt the entire illumination arm toward the patient. In some circumstances, column tilt can reduce reflected light and therefore glare but this is rarely necessary.
Video References
Several online video tutorials provide an excellent overview of the components and use of the slit lamp.
- Slit lamp tutorial from AAO Basic Ophthalmology[7]:
- Slit lamp overview from the University of British Columbia Medicine:
Slit Lamp Quick Guide
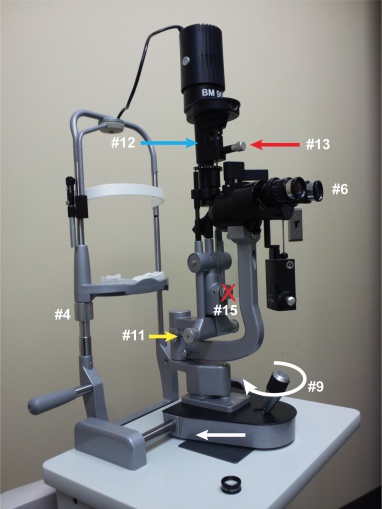
The following instructions are meant to provide a quick reference for conducting a slit lamp examination (see Figure 2).
- Ensure that the slit lamp is plugged in
- Clean forehead and chin rest
- Bring the table into position in front of the patient
- Adjust the chin height to position eyes at the level of the black indicator line with head in contact with the forehead band
- The patient can be instructed to hold the handlebars
- Set oculars at ‘0’ and adjust interpupillary distance like binoculars
- Unlock the carriage
- Adjust coarse focus by moving the entire carriage forward and backward at the base
- Move the joystick into position: turn clockwise to raise, counterclockwise to lower, fine focus in X and Y planes
- Turn the power switch on (below the table)
- Adjust beam width and intensity
- Set the light on the correct filter (white light or neutral density for general exam, cobalt-blue for fluorescein)
- Adjust the height of the beam
- Move the beam angle by swiveling the illumination are while grasping the beam width knob
- For general exams, do not adjust the decentering screw as it can result in loss of parfocality
- At the conclusion of the exam lock the carriage in place
- Turn off the slit lamp power switch
The Anterior Segment Examination
The slit lamp exam should be carried out systematically to ensure complete and efficient examination. The patient’s history and complaints may guide more focused examination, but an algorithmic approach to slit lamp examination facilitates smooth operation of the device and prevents the provider from overlooking subtle findings and jumping too quickly to obvious pathology. The examination can be divided into the following 8 stages:
- External Structures and Adnexa
- Lids and Lashes
- Conjunctiva and Sclera
- Cornea
- Anterior Chamber
- Iris and Pupil
- Lens
- Anterior Vitreous
1. External exam
Before looking into the oculars, take some time to examine the eyes and orbit grossly. Certain pathologies may be much more apparent by gross inspection than through the slit lamp. In particular, take note of any asymmetry in the eyes or adnexa. Begin with a moderate beam thickness, low illumination, and low magnification. With the viewing arm oriented directly in front of the patient, hold the illumination arm at an angle of 30-60° and examine the periorbital structures, noting any apparent inflammation, irritation, or lesions. Concerning lesions such as basal and squamous cell carcinoma can be appreciated during this stage of the exam.
2. Lids and Lashes
The lids should be examined closed and opened to evaluate for proper apposition. Be attentive to evidence of lagophthalmos, ectropion, entropion, blepharitis, and any signs of trauma. The entire eyelid margin should be systematically examined for evidence of edema, hordeolum, or chalazion and eyelashes should be carefully visualized to assess for trichiasis, scurf, or collarettes. These eyelash abnormalities may be indicative of blepharitis. The inferior lid margin should be reflected using a cotton-tipped applicator to better visualize the lower lid margin, lower lash follicles, inferior punctum, and meibomian glands.
3. Conjunctiva and Sclera
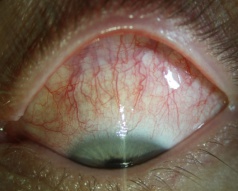
Both bulbar and palpebral conjunctiva should be examined. Carefully inspect the surface sclera, making note of the color, any injection, and inspecting for violaceous injection more prominent around the corneal limbus known as ciliary flush which suggests anterior uveitis. Retract the lower lid again and instruct the patient to look upward to examine the inferior bulbar and palpebral conjunctiva for signs of irritation or injection. Examine the lower fornix for foreign bodies, especially where the conjunctiva is irritated, or history suggests retained debris. Do the same for the upper lid and fornix, reflecting the tarsal plate by instructing the patient to look down, applying traction to several lashes to pull the upper lid away from the eye, and simultaneously pressing down on the tented tarsal plate with a cotton-tipped applicator while drawing the eyelid up[6]. Assess for signs of irritation that might suggest infectious or allergic conjunctivitis, scleritis, or episcleritis (Figure 3).
Minute vessels in the palpebral conjunctiva can be visualized at this stage of the exam. A useful exercise for learners is to center these vessels in the field of view and increase the magnification. Careful inspection will reveal trains of individual erythrocytes passing through the narrow lumen of these fine vessels.
4. Cornea
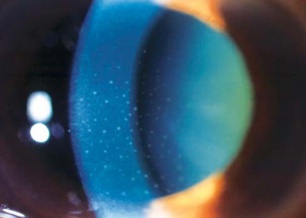
For examination of the cornea, the illumination arm should be shifted to a more oblique angle and narrow the beam. This will produce an optical cross section of the cornea, with partial reflection as the light passes through the tear film, epithelium, stroma, and Descemet’s membrane, and endothelium. The location of pathological features can be ascertained based on their proximity to the illumination source, with superficial layers closest to the light source. For example, mucous strands associated with dry eye reside on the ocular surface and will appear closest to the light source in optical section. Keratic precipitates on the other hand are located on the internal endothelium of the cornea facing the anterior chamber and will appear in the layer farthest from the illumination source[7] (Figure 4). With practice, this three-dimensional understanding of the optical sections becomes intuitive.
Thorough examination of the cornea involves a slow sweep of the illumination arm from temporal to nasal across the surface at low magnification, noting any irregularities in the thickness or transparency of the cornea. Due to the convex surface, a fine adjustment of the joystick backward until the light beam reaches the vertical meridian and then forward again must be coordinated with this sweep to maintain focus. Any abnormalities can then be followed up with direct observation, using oblique light and increased magnification to deduce the cross-sectional location of the abnormality.
5. Anterior Chamber
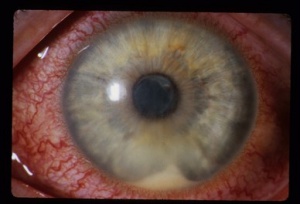
To examine the anterior chamber, narrow the beam to about 1mm wide and adjust the height to about 3mm. Under normal conditions, the anterior chamber is transparent; reflective material in the anterior chamber is usually indicative of pathology. In the context of ocular trauma or disease processes that could produce neovascularization of the iris, this chamber should be examined for blood in the anterior chamber (hyphema). Microhyphema, or individual erythrocytes in the aqueous humor, can occur and sometimes engaging the red-free filter helps to identify these, accentuating them as black spots against the backdrop of the iris or retinal reflex. Severe intraocular infection or inflammation may lead to an accumulation of purulent material in the anterior chamber (hypopyon) (Figure 5). Hyphema and hypopyon tend to settle in the dependent portion of the anterior chamber; carefully inspect the inferior chamber. Inflammation, especially anterior uveitis, can manifest with individual leukocytes (cell) and/or proteinaceous material (flare) in the anterior chamber[8]. Cells will appear as reflective particles floating in the aqueous humor while flare will make this medium appear turbid and hazy, making the beam more visible as it passes through the chamber. Instructing the patient to rapidly saccade left and right several times can agitate the aqueous humor, making these findings more apparent.
The depth of the anterior chamber is an important measurement, especially in evaluation of a painful red eye consistent with acute angle closure glaucoma. A physiologically narrow angle is also important to recognize due to the increased predisposition to glaucoma. Although gonioscopy is the definitive method for examining the iridocorneal angle, the depth of the anterior chamber depth can be approximated by directing the slit beam toward the corneal periphery at an angle of about 60° and examining the distance between the inner surface of the cornea and the iris (van Herick technique)[6][9]. If this distance is less than one quarter of the corneal thickness, the chamber is shallow warranting referral to an ophthalmologist[6]. Peripheral contact between these two structures is indicative of adhesion between the iris root and the cornea, and diagnostic of angle closure. Importantly, this test should be conducted prior to installation of dilating drops to avoid precipitating acute angle closure[7].
6. Iris and Pupil
Direct illumination should be used to examine the surface of the iris and the pupillary margin. Irregularities in pigmentation, raised lesions, or asymmetry should be documented. Note that it is normal for a small amount of hyperpigmented “pupillary ruff” to be visible at the pupil margin in myosis. Neovascularization of the iris (rubeosis iridis) is an indication of advanced ocular disease and should be noted. These irregular vessels usually first appear at the pupillary margin or iris root[6].
Retroillumination can be used to detect abnormalities in the iris. By shining a short, narrow beam directly through the pupil, abnormalities in the iris can be seen as areas of transillumination by light reflected off the retina. These so-called transillumination defects can result from a loss of pigmentation in the posterior iris and can be secondary to ocular inflammation or injury. Diffuse transillumination of the iris is a feature of ocular albinism.
7. Lens
Lens pathology is a common cause of visual impairment, especially in elderly individuals, and the appearance of the lens can be altered due to systemic disease. The crystalline lens is a multilaminar structure consisting of a superficial capsule, a cortex, and a deep nucleus (analogous to the coating, chocolate, and peanut of the famous two letter named candy, respectively). As in the cornea, these layers can be distinguished in optical section using a narrow slit beam. Although the lens is best examined in the dilated eye, the appropriate anatomical placement and transparency of the lens is easily confirmed without dilation. Bilateral dislocation of the lens or dislocation in the absence of significant trauma is a sign of systemic connective tissues disease such as Marfan syndrome.
The slit lamp is an ideal tool for evaluating cataracts as it provides information on the anatomical location of opacities indicative of etiology. Anterior capsular cataracts are generally associated with advanced age or diabetes. Acute angle closure glaucoma may produce glaukomflecken, grayish opaque spots on the anterior cortex of the lens. Nuclear sclerosis is the most common cause of age-related cataract and progress from hazy-white to yellow to brown with increasing density[6]. Cataracts of the posterior capsule and subcapsule are best identified using retroillumination against the retinal reflex. Posterior subcapsular cataracts are associated with corticosteroid use and prior uveitis[9].
Pseudophakia (prosthetic intraocular lenses) is common among patients of advanced age. The intraocular lens should be checked for proper placement in the visual axis, as subluxation could be a source of visual complaints.
8. Anterior Vitreous
The anterior vitreous is a restricted region of the vitreous immediately behind the lens. This region should be assessed for cell and flare in a manner similar to the anterior chamber. Inflammatory infiltrates in the anterior vitreous can indicate iridocyclitis. Pigmented cells (also called “tobacco dust”) in the anterior vitreous can be a sign of a retinal tear, retinal detachment, or vitreous hemorrhage[6]. These signs would necessitate a dilated funduscopic examination to include the peripheral retina.
9. Fluorescein Eye Stain
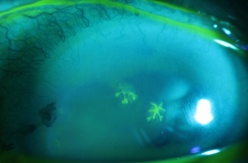
Fluorescein adheres to the basement membrane and emits yellow light under blue illumination[8]. Instillation of sodium fluorescein drops or introduction of fluorescein impregnated strips into the eye followed by slit lamp exam using the cobalt-blue filter will easily reveal corneal abrasions caused by trauma, infectious ulcerations, or dendritic lesions associated with herpes keratitis[6] (Figure 6).
Risks/Benefits
The risks associated with slit lamp examination are minimal. Patients with eye pain or photosensitivity may not tolerate the exam well, in which case efficiency and low light facilitate the examination. Use of the neutral-density filter can be helpful when patients exhibit photosensitivity, tearing, or apprehension during the exam. However, use of illumination so low that the examiner cannot confidently visualize structure will only prolong the exam. Procedures conducted at the slit lamp, such as foreign body removal, can carry risks and should only be attempted by experienced clinicians.
Limitations
The slit lamp must be thoroughly sanitized before and after each use. This includes the patient handles, chin rest, forehead rest, and applanation tonometer if present. In particular, care should be taken to thoroughly sanitize all surfaces of the slit lamp when patients exhibit signs of viral or bacterial conjunctivitis. The emergence of pandemic SARS-CoV-2 and severe manifestations of COVID-19 has brought attention to the need for modified examination techniques that mitigate transmission risk. Recent data suggest that the slit lamp exam may pose a greater risk than other examinations, as patient and provider face one another in close proximity during the exam. Among healthcare providers, ophthalmologists have shown disproportionately high rates of infection[10][11]. Several precautionary measures to limit droplet transmission have been suggested including mask usage and shields mounted on the slit lamp between the patient and provider[12][13]. Breath shields have been a feature of slit lamps for decades, and recent research suggests that larger shields have greater efficacy in limiting particle spread[14]. Plexiglass is an ideal material as it is durable and transparent (Figure 7). This modification should be used in conjunction with other forms of personal protective equipment, such as face masks for both patient and provider, to limit respiratory droplet exchange during the exam.
References
- ↑ Davison, J. & Wilson, G. Allvar Gullstrand. Clin Exp Ophthalmol 33, 407, doi:10.1111/j.1442-9071.2005.01056.x (2005).
- ↑ Ehinger, B. & Grzybowski, A. Allvar Gullstrand (1862-1930)--The gentleman with the lamp. Acta Ophthalmol 89, 701-708, doi:10.1111/j.1755-3768.2011.02235.x (2011).
- ↑ Gloor, B. R. Hans Goldmann (1899-1991). Eur J Ophthalmol 20, 1-11, doi:10.1177/112067211002000101 (2010).
- ↑ Fankhauser, F. Remembrance of Hans Goldmann, 1899-1991. Surv Ophthalmol 37, 137-142, doi:10.1016/0039-6257(92)90077-7 (1992).
- ↑ Gellrich, M. M. The fundus slit lamp. Springerplus 4, 56, doi:10.1186/s40064-015-0838-5 (2015). PMC4401483
- ↑ Jump up to: 6.0 6.1 6.2 6.3 6.4 6.5 6.6 6.7 Blomquist, P. Practical ophthalmology : A manual for beginning residents. 7th Ed, (American Academy of Ophthalmology, 2015).
- ↑ Jump up to: 7.0 7.1 7.2 Allen, R. C. & Parker, R. A. Basic Ophthalmology: Essentials for Medical Students. 10th Ed, (American Academy of Ophthalmology, 2016).
- ↑ Jump up to: 8.0 8.1 Riodan-Eva, P and Augsburger, A. Vaughan and Asbury's General Ophthalmology. 19th Edition. 2017. McGraw-Hill Education. ISBN 0071843531
- ↑ Jump up to: 9.0 9.1 James, B and Benjamin, L. Ophthalmology: Investigation and Examination Techniques. 2007, Elsevier Health Science. ISBN 9780750675864
- ↑ Breazzano MP, Shen J, Abdelhakim AH, et al. New York City COVID-19 resident physician exposure during exponential phase of pandemic. J Clin Invest. 2020;139587. doi: 10.1172/JCI139587
- ↑ Romano MR, Montericcio A, Montalbano C, et al. Facing COVID-19 in Ophthalmology Department. Curr Eye Res. 2020;45(6):653-658. doi:10.1080/02713683.
- ↑ Olivia Li JP, Shantha J, Wong TY, et al. Preparedness among Ophthalmologists: During and Beyond the COVID-19 Pandemic. Ophthalmology. 2020;127(5):569‐572. doi:10.1016/j.ophtha.2020.03.037
- ↑ Sadhu S, Agrawal R, Pyare R, et al. COVID-19: Limiting the Risks for Eye Care Professionals. Ocul Immunol Inflamm. 2020;28(5):714-720. doi:10.1080/09273948.2020.1755442
- ↑ Poostchi, A., Kuet, M. L., Pegg, K., Wilde, C., Richardson, P. S. & Patel, M. K. Efficacy of slit lamp breath shields. Eye (Lond), doi:10.1038/s41433-020-0940-y (2020). PMC7216572


