Smartphone Funduscopy - How to Use Smartphone to Take Fundus Photographs
All content on Eyewiki is protected by copyright law and the Terms of Service. This content may not be reproduced, copied, or put into any artificial intelligence program, including large language and generative AI models, without permission from the Academy.
Background
With the drastic improvement in smartphone optical and sensory capabilities over the previous decade, using smartphones in fundus imaging is becoming a more powerful clinical tool, particularly in low-resource settings where high-end informatics infrastructure and imaging systems for teleophthalmology are not as widely available. Smartphone photography and videography has been used with increasing frequency since 2010, as first reported by Lord and colleagues.[1] Currently, there are at least five known apparatus/software package solutions on the market: DigiSight Paxos Scope (San Francisco, USA)[2], Peek Retina (London, UK)[3], D-EYE (Padova, Italy)[4], Remidio Fundus on Phone (Bangalore, India)[5], and Welch Allyn Panoptic with iExaminer (Skaneateles Falls, USA). In general, these setups offer mechanical stabilization of hardware along the pupillary axis with ideal light control through an external light source and reduction of ambient light pollution. Other academia-based smartphone attachments/apparatus have been developed and tested using general principles of direct and indirect ophthalmoscopy.[6][7][8][9][10] While quality of smartphone-captured media cannot compare to higher-end fundus cameras[11], the widespread availability, built-in data transmission capability, and of course necessity to image at the point-of-care overweigh to deficits in image resolution.
The simplest, lowest-cost setup is using a smartphone and an indirect condenser lens in patients with dilated pupils.[7][12][13][14][15] Software applications are numerous in an ever-changing landscape. Devices running iOS (Apple Inc, Cupertino, USA) and Google Android OS-running smartphones will continually receive improved native camera application through periodic updates. For a more robust software, we recommend ProCamera (Cocologics GmbH) on iOS devices for its price, manually-adjustable focus, zoom, exposure setting, and light intensity. FiLMiC Pro (FiLMiC Inc) is available on both iOS and Android; it offers greater quantity and magnitude of settings manipulation than ProCamera, though at a premium, and has been successfully deployed by Mukai and colleagues.[14][16]
All articles published to date on this topic have been targeted at practicing ophthalmologists and residents; moreover, more medical students than ever are committed to working in global health, especially internationally-based eye care systems, and may find a primer on ophthalmic imaging useful in their pursuits. We therefore present a technique for smartphone fundus imaging intended for an audience of medical students.
Imaging process
Tools
- Smartphone: iPhone or smartphone deploying Android OS (for example, Samsung Galaxy series)
- Condenser lens: 20 diopter (20D) lens are most frequently available. You may also have a 28D lens.
- Mobile application (app):
- EyeTakes (Dr. Sarah Maki): free, elegant, data safe, time efficient app available on iOS
- Native camera app: If this is the only software available on your operating system, use this for video recording with the LED light on as you will need a continuous light source for illumination.
- Paid apps
- ProCamera (Cocologics GmbH) – iOS only
- FiLMiC Pro (FiLMiC Inc) – Android and iOS
Photography
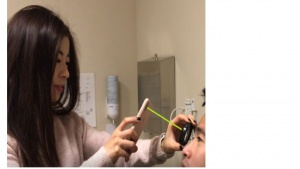
Base position setup Figure 1
- Patient positioning: typically the patient is reclined and you are standing. If the patient can lie supine and you hover directly over, that would be even better.
- Hold the condenser lens about 5 cm (2 in) from the patient’s cornea. Stabilize the lens on the patient’s forehead with the 4th and 5th digits. You may need to use 3rd or 4th digit to raise patient’s eye lid.
- The condenser lens rim: one side is whitened. That side faces the patient. Make sure all smudges and dust are wiped clean from the lens.
- Hold the phone about 20 cm (8 in) from the condenser lens
- It is critical to maintain a steady axis of alignment between the phone’s camera and the condenser lens, so imagine the condenser lens is stuck on a pole attached to your phone.
Adjustments
- Generally you can make 3 adjustments to get a focused view of the retina:
- Move distance between lens and phone
- Move the lens farther away from patient’s cornea
Note: depending on the lens power you use, the distance to cornea changes. For 20D, start at 5 cm. This is explained further below in “Switching condenser lenses” - Move in XY plane (ie. Side to side, up/down) as a whole lens/phone unit.
- Once you see the red reflex on your phone, you are basically in the right position or close to right position and only need minor adjustments to move to the correct imaging plane. The patient may report the entoptic phenomenon, such as seeing shadows of their vascular arcades.
- If you have any troubles, ask a second person to help you steady the condenser lens to make sure the light is centered directly on the visual axis.
- Adjust the digital zoom so you can fill the entire screen with the diameter of the condenser lens. The aerial image you see on the smartphone screen is a real, inverted image of the patient’s retina
- If you are using the smartphone’s native application, you can start the video recording at this point. If you are using ProCamera, FiLMiC Pro or another app, you can take an image whenever you see abnormal findings.
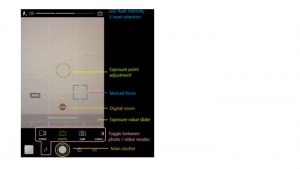
- As an example using the ProCamera app, please see Figure 2 for basic profile of settings adjustments.
Table 1. View of the retina and patient eye movements
|
Views |
Instructed movements |
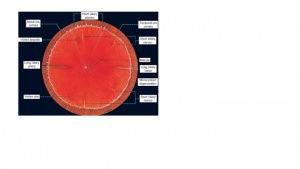
Normal features on fundus exam For diagrammatic representation, please see Figure 3. |
Example images |
|---|---|---|---|
|
Optic disc |
Ask the patient to look straight and fixate on some distant object. |
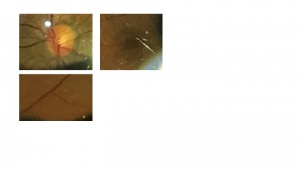
Cup to disc ratio; sharp margins, pink and healthy optic disc rim. |
Figure 4a |
|
Macula |
Ask the patient to look at you or the light. You could consider performing this step at the end of the fundus exam as the bright lights can bother the patient. |
The clinical macula is within the temporal arcades, should be flat and with a center foveal reflex. The retina blood vessels should be normal in size without tortuosity. |
Figure 4b |
|
Periphery |
Ask the patient to (1) look up, (2) up and right, (3) up and left, (4) all the way down, (5) down and right, (6) down and left |
Retina is attached; vortex ampula veins, long and short ciliary nerves and if peripheral enough you will see the ora serrata. |
Figure 4c |
Patient comfort tips
- Examining the periphery first allows the patient to accommodate to light intensity before you acquire the optic disc and macula views
- If necessary, use artificial tears to keep patient comfortable and not feeling excessively dry
- While the intensity of most smartphone built-in LEDs are extremely safe[17], the intensity is still excessive for most people given the mydriasis, so take breaks when you notice signs of discomfort and fatigue. If you do not use a paid app that allows reduction of intensity, you can place 3-4 layers of semi-transparent piece of tape over the LED.
- As you develop skills excellency, you could always point the smartphone away from the patient as they make eye movements, which is commonly done in indirect ophthalmoscopy with the BIO headsets.
- For a video demonstrating this technique, please find a companion video here:
- For another demonstration, Dr. Julián Espinosa of Universidad CES in Medellín has published an excellent video demonstrating this technique.
- When you become excellent at this, try the retina selfie as demonstrated by Dr. Enrique Palacios.
Switching condenser lenses
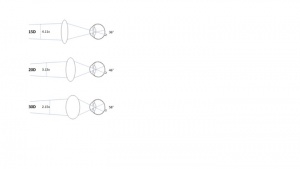
- Field of view = Diopter of lens x 2
- For example: 20D x 2 = 40 degrees
- Angular magnification = Power of human eye/ Diopter of lens
- For example: 60 diopter/20 diopter = 3x
- On average, a human eye’s power is +60D but that’s just a population average. A myopic eye will have higher power (e.g. 70D); a hyperopic eye has lower power (e.g. 50D)
- Field of view = Diopter of lens x 2
- A higher powered lens (eg. 28D) will therefore give you less angular magnification but higher field of view (Figure 5).
Table 2. Condenser lens specifications
|
Power |
Magnification (angular) |
Field of view |
Working distance from cornea |
Good for |
|---|---|---|---|---|
|
15D |
4.11x |
36° |
7.2 cm / ~3 in |
Detailed view of optic disc and macula |
|
20D |
3.13x |
46° |
5 cm / ~2 in |
Most commonly used lens |
|
28D |
2.27x |
53° |
3.3 cm / 1.3 in |
Very helpful when patient has small pupils even when dilated |
|
30D |
2.15x |
58° |
3 cm / ~1.2 in |
When pan-retinal view is more important to convey pathological process, but details are less important |
|
40D |
1.67x |
69° |
2 cm/~0.8 in |
Typically used for infants and small children to obtain as broad as possible view |
Note these specifications are for VOLK brand lenses (VOLK Optical Inc, Mentor, USA). Other manufacturers may not fit these exact specifications but the relationships hold true in general.
File transfer
- Option 1: If you are using the smartphone’s native camera app, you are probably recording a video in order to keep the LED flash on as you record. Play the video file back on your phone and pause at the frame of interest. This should be showing the abnormal finding you wish to convey. Zoom in until you achieve optimal resolution. Take a screenshot. For each feature you wish to convey, take the screenshot and save to your phone’s hard drive. This editorial step is critical to saving your consultant time and focus her/his attention on the important details. Moreover, sending a video file is costly and takes much more time to upload and download.
- Option 2: If you are using ProCamera, FiLMiC, or another paid app, you are likely able to take images with the LED flash providing constant illumination. Those image files should be accessible and ready for transfer. If you must zoom into an abnormal finding to provide better resolution, these apps have a crop and save function but you can also take a screenshot as you would with the native camera app. The most secured way to transmit files is using whichever companion mobile data transmission software accompanies your health system’s electronic medical record (EMR). For those using Epic EMR, this would be Epic Haiku, which is available for iOS and Android. Consult the EMR support group at your health system for configuring the app on your smartphone so you can send media files as attachments to a patient’s medical record.
Low-cost attachment
Dr. Ramesh and colleagues of Sundar Eye Hospital in Chennai demonstrate a "do-it-yourself" alternative to commercialized attachments that stabilize the lens along the imaging axis.
Conclusion
Examination skills take repeat practice to gain proficiency and eventually perfection. The learning curve is 5-10 imaging sessions. In summary, we have provided a walkthrough for the technique of smartphone photography and videography intended for medical students, who may not already be experts in indirect ophthalmoscopy.
References
- ↑ Lord RK, Shah VA, San Filippo AN, Krishna R. Novel uses of smartphones in ophthalmology. Ophthalmology. 2010;117(6):1274-1274e1273.
- ↑ Toy BC, Myung DJ, He L, et al. Smartphone-Based Dilated Fundus Photography and near Visual Acuity Testing as Inexpensive Screening Tools to Detect Referral Warranted Diabetic Eye Disease. Retina. 2016;36(5):1000-1008.
- ↑ Giardini ME, Livingstone IA, Jordan S, et al. A smartphone based ophthalmoscope. Conf Proc IEEE Eng Med Biol Soc. 2014;2014:2177-2180.
- ↑ Muiesan ML, Salvetti M, Paini A, et al. Ocular fundus photography with a smartphone device in acute hypertension. J Hypertens. 2017;35(8):1660-1665.
- ↑ Rajalakshmi R, Arulmalar S, Usha M, et al. Validation of Smartphone Based Retinal Photography for Diabetic Retinopathy Screening. PLoS One. 2015;10(9):e0138285.
- ↑ Maamari RN, Keenan JD, Fletcher DA, Margolis TP. A mobile phone-based retinal camera for portable wide field imaging. Br J Ophthalmol. 2014;98(4):438-441.
- ↑ Jump up to: 7.0 7.1 Maamari RN, Keenan JD, Fletcher DA, Margolis TP. A mobile phone-based retinal camera for portable wide field imaging. Br J Ophthalmol. 2014;98(4):438-441.
- ↑ Shanmugam PM, Mishra D, Ramanjulu R. Fluorescein fundus angiography using a smartphone. Retina. 2014;34(3):e6-7.
- ↑ Raju B, Raju NS, Akkara JD, Pathengay A. Do it yourself smartphone fundus camera - DIYretCAM. Indian J Ophthalmol. 2016;64(9):663-667.
- ↑ Toslak D, Ayata A, Liu C, Erol MK, Yao X. Wide-Field Smartphone Fundus Video Camera Based on Miniaturized Indirect Ophthalmoscopy. Retina. 2018;38(2):438-441.
- ↑ Darma S, Zantvoord F, Verbraak FD. The quality and usability of smartphone and hand-held fundus photography, compared to standard fundus photography. Acta Ophthalmol. 2015;93(4):e310-311.
- ↑ Ademola-Popoola DS, Olatunji VA. Retinal imaging with smartphone. Niger J Clin Pract. 2017;20(3):341-345.
- ↑ Suto S, Hiraoka T, Okamoto Y, Okamoto F, Oshika T. [Photography of anterior eye segment and fundus with smartphone]. Nippon Ganka Gakkai Zasshi. 2014;118(1):7-14.
- ↑ Jump up to: 14.0 14.1 Stryjewski T, Mukai, S. The Retina selfie: a techniques video demonstrating smartphone ophthalmoscopy. In. Digital Journal of Ophthalmology2016.
- ↑ Nazari Khanamiri H, Nakatsuka A, El-Annan J. Smartphone Fundus Photography. J Vis Exp. 2017(125).
- ↑ Haddock LJ, Kim DY, Mukai S. Simple, inexpensive technique for high-quality smartphone fundus photography in human and animal eyes. J Ophthalmol. 2013;2013:518479.
- ↑ Kim DY, Delori F, Mukai S. Smartphone photography safety. Ophthalmology. 2012;119(10):2200-2201; author reply 2201.


