Smart Phoneography - How to Take Slit Lamp Photographs with an iPhone
All content on Eyewiki is protected by copyright law and the Terms of Service. This content may not be reproduced, copied, or put into any artificial intelligence program, including large language and generative AI models, without permission from the Academy.
Smart Phoneography
Taking high quality photographs with your smartphone (e.g., iPhone) or tablet computer (e.g., iPad) comes down to three main factors: a) having a camera with at least 5 megapixels, b) creating the ideal lighting, and c) being able to steady your camera (either with an adapter or with your gifted ophthalmic surgical hands). Like any skill, it will take time--likely a few weeks--in order to perfect your ophthalmic photography skills. My recommendation is to photograph one eye a day and try one new thing while taking the photographs. Compare your new photographs to your old photographs each day. You will quickly learn what techniques work best for your slit lamp and camera device.
Technical Requirements
In order to capture high quality pictures, your camera needs to have at least 5 megapixels.
Lighting
The importance of lighting cannot be overemphasized and can be divided into two sources: 1) external illumination and 2) slit beam illumination. While it is only necessary to use one illumination source at a time, using both sources at the same time likely will allow you to obtain your best pictures. Also, there is a tendency for images to white out due to overexposure. The easiest solution for the iPhone is to download a camera app (e.g., Procamera or Camera Awesome) that allows you to control the exposure (look further below for more details). Another solution to addressing overexposure is to use a dimmer light setting on the slit lamp or a diffuser if you have one available.
External Illumination
Room Lights
Leave the room lights on.
Focused Light Sources
A transilluminator, penlight, etc. can be held by an assistant or the patient. You can also clip a light onto the slit lamp (ie. clip-on light for $5 using Google search available). For optimum results, the light source should be held in line with the pupillary axis.
Slit Beam Illumination
I prefer to use a narrow slit beam on a low to medium intensity setting while my assistant or patient directs the light from the transilluminator towards the pupillary axis.
Devices
iPhone
Adapters
It is possible to take slit lamp photos by placing the lens of your smartphone flush with the slit lamp ocular; however, the use of an adapter will allow you to obtain higher quality photographs. Below you will find several options.
1. EyePhotoDoc. A specific adapter is manufactured for Haag-Streit BQ (multiple magnification changer), Haag-Streit BM (magnification flip lever below eyepiece), Marco - IIB (H/S BM clone), andTopcon SL-3E (H/S BM clone). Occasionally, the ocular needs to be pulled out a few millimeters to slide the adapter into position.
The EyePhotoDoc adapter can purchased by clicking here.
2. Zarf iPhone Adapter. It can be purchased by clicking here.
3. Magnifi iPhone Adapter. The adapter fits Zeiss operating microscopes with f125 oculars.
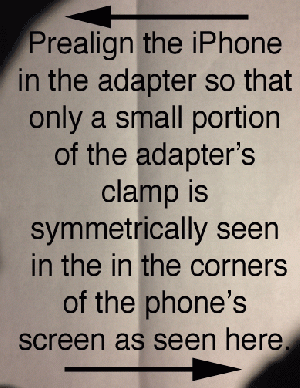
4. SteadyPix Telescope Photo Adapter for iPhone. The adapter fits Leica M840 operating microscopes and Haag-Streit 900 BM models. The adapter's adjustable eyepiece clamp has a diameter of 35 mm (1.38 in) and should fit a wide range of slit lamp oculars. Aligning the slit lamp ocular and the camera lens can take a little longer than the Keeler Adapter because the eyepiece clamp's arm is also adjustable. To achieve more rapid centration of the slit lamp ocular and the camera's lens, prealign the iPhone in the adapter so that only a small portion of the adapter’s clamp is symmetrically seen in the corners of the phone’s screen.
It can be purchase by clicking here.
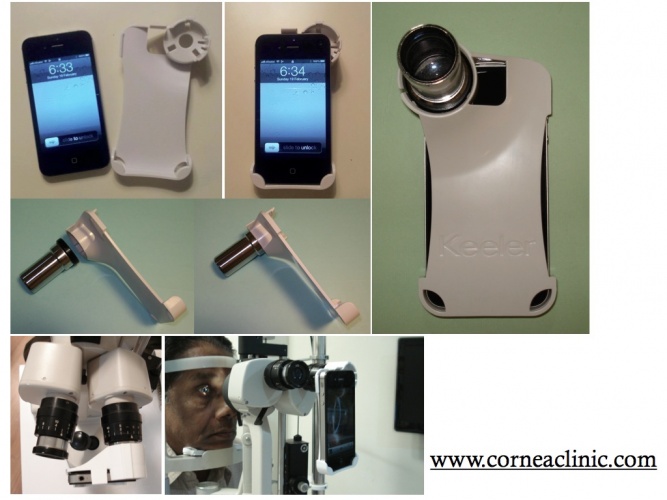
5. Keeler Portable Slit Lamp iPhone 4 image adapter. The adapter has been reported to be compatible with the following slit lamp models: Haag-Streit 900 BM (older series) and Topcon SL-3F. It has been reported that the adapter is not compatible with the following slit lamp models: Topcon SL-D7, Mentor. When using the Keeler adapter with the Haag-Streit 900 BM slit lamp, a moderate amount of force has to be applied to attach the adapter to most Haag-Streit slit lamp oculars. The process can take several minutes.
The Keeler adapter can be purchased by clicking here.
To view Dr. Fogla’s excellent video tutorial on how to take slit lamp photography with the iPhone and Keeler slit lamp adapter click here.
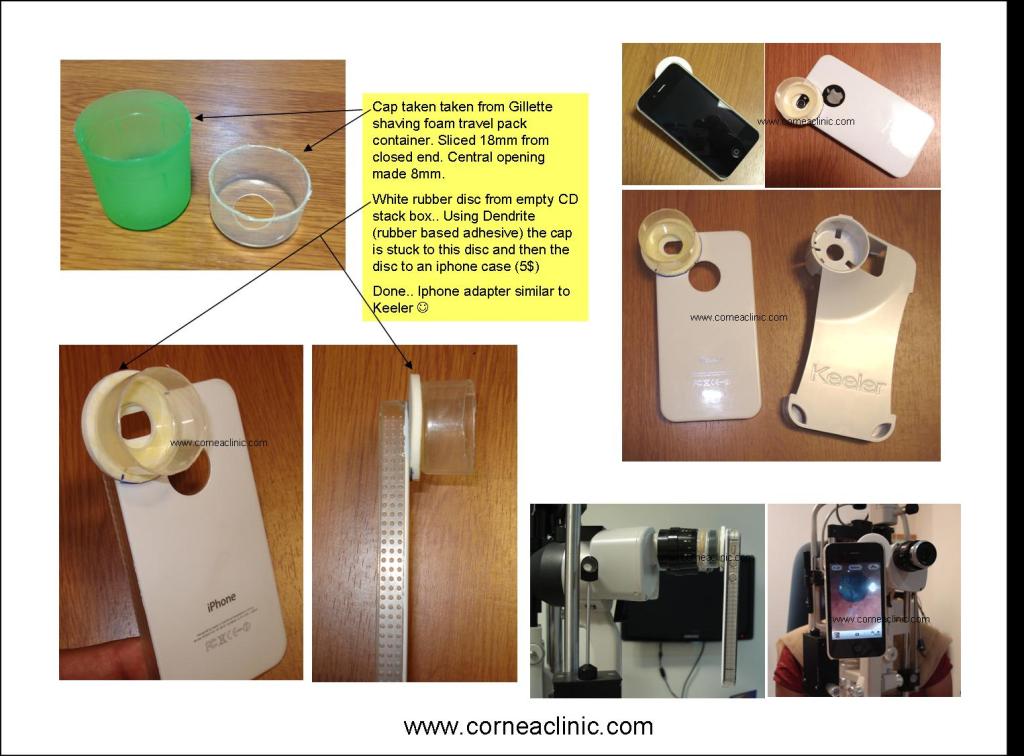
A Similar Do-It-Yourself Adapter Option:
6. SkyLight. This device can be adjusted to fit most smart phones. It may be a reasonable alternative for smart phones other than iPhones but likely will be more time consuming to align. It can be purchased by clicking here.
7. Tiger Lens.
8. iExaminer.
Fixes to Adapter Issues
My adapter does not fit my slit lamp oculars. It is possible that you can order an ocular with an appropriate diameter from the maker of your slit lamp or from a company like the Ophthalmic Instrument Company. This solution has helped some Zeiss slit lamp owners successfully use the Keeler adapter.
Apps and Software
To obtain the best photographs possible, you will need to be able to control the exposure, point of focus, and zoom. For the iPhone, the ProCamera app by Jens Daemgen or Camera Awesome app (free) by SmugMug available in the Apple App Store works quite well.
The tips below will help you take better pictures with the Procamera or Camera Awesome app. Click here or see below for a video demonstrating the steps.
- Fill the iPhone viewing screen with your image. There are two options:
- Adjust the distance between your iPhone’s camera lens and slit lamp ocular until the image fills the iPhone viewing screen. This may be difficult or impossible if your iPhone slit lamp adapter does not allow for such adjustments.
- Increase your zoom by tapping just above the camera icon that is at the very bottom and center of the screen or use the pinch-to-zoom feature. Zoom in until the image of the image fills the iPhone viewing screen. I recommend using a slit lamp magnification of 10x in order to maintain the best focus.
- Separate your Focus and Exposure. Once the eye is close to being in focus, tap the center of the screen with two fingers. This will separate your control of the focus and exposure.
- Place the FOCUS square over your specific point of interest (e.g., superior pannus, temporal infiltrate, etc.).
- Place the EXPOSER circle over the area of the image that is most bleached out due to overexposure.
- Tap the picture of the icon at the very bottom and center of the screen in order to obtain the image.
Video Tutorials
To view Dr. Fogla’s excellent video tutorial on how to take slit lamp photography with the iPhone and Keeler slit lamp adapter click here.
To see examples of photographs and videos taken using the EyePhotoDoc adapter, visit this site.
Advance Techniques/Tips
- The image you see through the slit lamp ocular will not be the same as the image that you see through on your smartphone’s viewing screen, especially when you are performing retroillumination. Focus the image through the slit lamp’s ocular then fine-tune the focus through smartphone’s viewing screen.
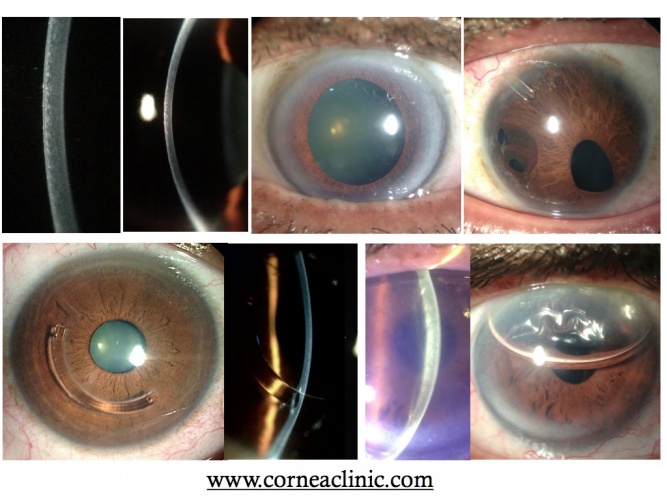
Picture Examples
Archiving Photographs and Videos
Photosync
The Photosync app for the iPhone allows you to wirelessly transfer your photos/videos from or to your computer (PC or Mac) and other i-Devices (e.g., iPhone).
Evernote
To download Evernote click here. Evernote can be used to organize your ophthalmic images and videos.


