Retinoscopy
All content on Eyewiki is protected by copyright law and the Terms of Service. This content may not be reproduced, copied, or put into any artificial intelligence program, including large language and generative AI models, without permission from the Academy.
Introduction
Description/Overview
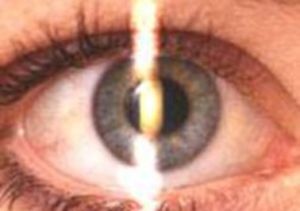
Retinoscopy is an exam technique that objectively measures the refractive error of the eye. This is done by looking through an optical instrument called a retinoscope to observe the movement of reflected light in a patient’s pupil.[2] This objective assessment allows the examiner to assess refractive error without subjective input from the patient, making it a useful tool for evaluating infants, young children, adults with developmental delays, and others who may not otherwise be able to cooperate for subjective refraction.[3] In addition to determining refractive error, retinoscopy may also be used to evaluate accommodative function and to assess for ocular surface and media pathologies such as cataracts.[4]
History of Retinoscopy
The practice of retinoscopy dates back to the 19th century.[5] In 1859, Sir William Bowman was the first to describe an irregular linear fundus reflex in eyes with astigmatism. Prior to this, refractive errors were solely assessed by subjective methods. In 1873, French ophthalmologist Cuignet made the first objective diagnosis of refractive errors using a simple mirror ophthalmoscope, during which he discovered that moving light from a plane mirror across the pupil produced a reflex from the fundus that also moved, varying in direction, speed, and brightness depending on the individual. In attributing this reflex to the cornea, he named his technique “keratoscopie” and used this to qualitatively categorize refractive errors into groups like myopia, hyperopia, and astigmatism. In 1878, Mengin more accurately characterized the fundus as the source of the reflexes. In 1880, Parent published his technique to quantify objective refraction, measuring the refractive error with lenses.[5] Over time, reflecting retinoscopes have been replaced by luminous models that produce light within the instrument. Spot retinoscopes, which have a light source that produces a spot of light, can still be found in use today. However, more commonly used are modern streak retinoscopes which project a linear beam of light to better appreciate the linear fundus reflex in astigmatism. Additionally, vengeance of light could not be altered using a spot retinoscope but can be using a streak retinoscope. Today, electric retinoscopes utilize a rotating slit first developed by Jack Copeland in the 1920s to enable to examiner to compare all ocular meridians. The Copeland streak retinoscope, patented in 1927, popularized the streak technique that is still utilized today.[5]
Types of Retinoscopy
There are two main types of retinoscopy, static and dynamic. Static retinoscopy requires the patient have relaxed accommodation which can be achieved by focusing on a distant object or through cycloplegic agents. Meanwhile, dynamic retinoscopy requires the patient have active accommodation by focusing on a near object and is useful to evaluate the effectiveness of accommodation.
Principles of Static Retinoscopy
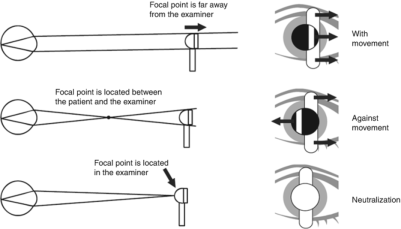
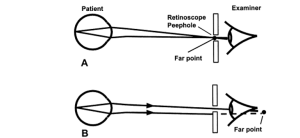
Retinoscopy determines a patient’s refractive error by establishing what corrective lens places the far point of the eye at infinity. Infinity is simulated at the peephole of the retinoscope where all light beams reflecting from the patient’s eye are gathered. The far point is the point where light from the retinoscope focuses after reflecting off the retina. It is defined as the point in space that is conjugate with the retina in a non-accommodating eye.[5] When the far point is located behind the retinoscope or behind the retina, no change in the direction of light will be observed, creating a “with motion” reflex. When the far point is located between the retinoscope and the patient’s eye, this point acts as a fulcrum, creating an “against motion” reflex. When the far point is in the plane of the retinoscope, neutrality is observed with no motion of the reflex.[6]
There exist four main refractive states of the eye: emmetropia, myopia, hyperopia, and astigmatism. Emmetropia (normal vision) is a refractive state wherein parallel light rays are focused on the fovea of a non-accommodating eye and emerge as parallel light rays. If this is the case, neutralization will be observed. Myopia consists of light rays that come to a point of focus in front of the retina in a non-accommodating eye and emerge as converging light rays. “Against motion” is observed in uncorrected myopic patients. Hyperopia consists of light rays that come to a point of focus behind the retina in a non-accommodating eye and emerge as diverging light rays. Hyperopia produces “with motion” on retinoscopy in optically uncorrected patients. Lastly, with astigmatism, light rays form two points of focus in the eye. Astigmatism can produce either a “with” and/or “against motion” reflex.[6]
The location of the far point can be altered based on the correcting lens placed in front of the eye. Patients with emmetropia will already have the far point at infinity since the rays reflect parallel from the eye and require no correcting lens. Meanwhile, patients with myopia will have a far point between the patient’s eye and infinity since the rays leave the eye converging, requiring a minus lens to push the far point outwards. Patients with hyperopia will have a far point beyond infinity since the rays reflect diverging from the eye, requiring a plus lens to pull the focal point towards the eye.[5]
Anatomy of the Streak Retinoscope
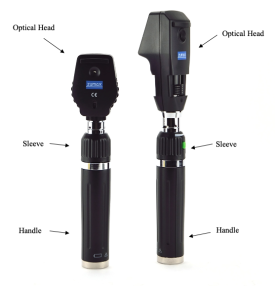
Most retinoscopes used today utilize Copeland’s streak projection system and consist of three main parts: the head, neck, and handle.
Optical Head
The optical head projects a slit beam of light from one side of the head and has an observer window on the other. The light originates from a bulb and passes through a condensing lens. This lens focuses rays from the light source onto a mirror, bending the light beam at a right angle to the axis of the handle so that it is properly projected from the instrument head.[5]
Sleeve
The sleeve lies below the optical head and controls both meridian (or streak rotation) and vergence (or streak focus).[7] By sliding the sleeve up or down, the distance between the bulb and lens is changed to either converge or diverge the light streak. Different sleeve positions are utilized based on the type of retinoscopy technique used. Rotating the sleeve rotates the orientation of the streak around different meridians.
- Plane mirror effect: apparent light source is behind the retinoscope, creating parallel light rays.
- Concave mirror effect: apparent light source is in front of the retinoscope, creating concave light rays.[6]
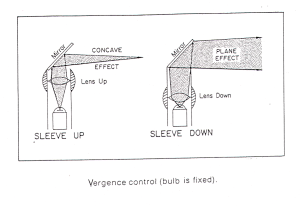 Plane mirror and concave effect using retinoscope.[8]
Handle
The handle contains the battery which provides the current source.
Static Retinoscopy Technique
The following steps should be done when performing static streak retinoscopy. The procedure described below is for both loose lenses and using a phoropter.
Set up
- Review and collect relevant history. Understanding any relevant history such as current glasses prescription and past measurements of visual acuity will help estimate the refractive correction.
- Relax the patient’s accommodation. This can be done by asking the patient to fixate on a distant target (large letter or white dot) or by dilating the eyes with a cycloplegic agent. Both eyes should be open.
- Create a calm environment in a quiet and dimmed room. Dimming the lights will provide a higher contrast view of the pupillary reflex.[4]
- Position the patient. Ideally, the patient will be sitting upright. The examiner should sit at arm’s length from the patient.
- If using a phoropter, follow these steps:
- Set up the patient behind the phoropter so their forehead is comfortably set against the forehead rest.
- Adjust the interpupillary distance for the patient and ensure the phoropter is leveled.
- Ensure the phoropter is aligned so the patient can see with both eyes.
- Set both eye holes to the open position (0).
- Set sphere and cylinder power to zero for each eye.[6]
- Align the retinoscope sight hole with the visual axis of the patient’s right eye.
- Switch on the retinoscope. Ensure the retinoscope is in plane mirror effect mode. This will reflect parallel rays that do not come to a focal point.
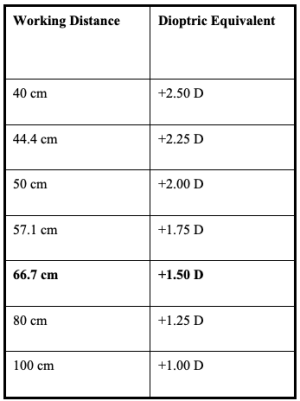
- Determine your working distance. Sit as far back from the patient as possible while still being able to adjust the phoropter or loose lenses. Working distance is calculated by taking the dioptric equivalent of your distance from the patient’s eye.
Examination technique
- Begin with the retinoscope streak in the vertical position. Look through the retinoscope and direct the light at the patient’s right pupil to visualize the red reflex. Sweep the retinoscope streak horizontally across the patient’s pupil. Compare the movement of the reflex in the pupil with the movement of the retinoscope. “With movement” means the reflex is moving in the same direction as the retinoscope streak, whereas “against movement” means the reflex is moving in the opposite direction to the retinoscope streak. Note the direction of movement plus reflex brightness, speed, and width.[4]
- Rotate the retinoscope streak to the horizontal position and sweep across the pupil vertically.
- Rotate the retinoscope streak and repeat sweeping for the oblique meridians at 45 degrees and 135 degrees.
- Determine if the refractive error is spherical or astigmatic. For spherical errors, the observed reflex will have consistent direction, brightness, speed, and width in all meridians. For astigmatic errors, the observed reflex will appear different in different meridians.[4]
- Determine the spherical component by achieving neutrality with the correct lens. This is done by holding up various lenses in front of the examined eye at a distance similar to where a glasses lens would sit on the patient. The examiner and retinoscope should remain an arms distance away. The neutral point is achieved when the examiner sweeps across the pupil and the reflex fills the entire pupil with no perceived movement. Follow the principles of retinoscopy: streak motion, reflex width, and streak speed.
- Streak motion: The pneumonic “SPAM” can be used to remember which lenses to use: Same (“with movement”) requires Plus power while “Against movement” requires Minus power.[10] With hyperopic patients (with motion), add plus lenses to move the focal point forward onto the fovea. With myopic patients (against motion), add minus lenses to move the focal point back onto the fovea.[6]
- Reflex width: The beam will become wider as neutrality is approached for all types of refractive error.[6]
- Streak speed: Proximity to neutrality can be indicated by the speed and brightness of the beam. When nearing neutrality, the reflex will appear brighter and move faster.[11]
- The examiner has passed the neutral point with the corrective lens if the reflex begins moving in the opposite direction. This means too much power is being used and the examiner should decrease lens power until the neutral point is observed.
- Double check the neutral point. This can be done by observing the reflex movement when moving slightly forward and backwards from the normal working distance. A fast “with movement” reflex should be seen when slightly forward while a fast “against movement” reflex should be seen when slightly backward from normal working distance.
- For astigmatic refractive errors, when using a plus cylinder neutralize the meridian with most minus or least plus first. When using a minus cylinder, neutralize the most plus or least minus meridian first.
- When working in plus cylinder, the cylinder axis will be 90 degrees from the meridian with the most defined with-motion streak. Use the thickness phenomenon, intensity phenomenon, break and skew phenomena, and straddling the axis to determine the refractive error axis.
- The thickness phenomenon: the reflex will appear narrowest when you streak the meridian of the correct axis. As you move away from the correct axis, the streak becomes wider.
- The intensity phenomenon: The reflex appears brightest when you streak the meridian of the correct axis and duller as you move away from it.
- The break and skew phenomena: With higher amounts of astigmatism, the reflex will tend to stay aligned with the cylinder axis even if you move the streak away. This acts as a guide for the correct axis.
- Straddling the axis: When the correct axis is neutralized, the meridian exactly 90 degrees away will have the most defined with motion reflex.
- Neutralize both astigmatic axes using the same technique as for spherical refractive errors.[6]
- Repeat exam for patient’s left eye. When examining the patient’s left eye, the examiner should look through the retinoscope with the left eye and hold the instrument in the left hand.
Recording of results
- Subtract the working distance. In determining the final spherical error, calculate the number of diopters that need to be offset based on the working distance. This is done by subtracting the inverse of the working distance in meters from the retinoscope result. For instance, if the working distance between the retinoscope and lens was 50 cm, then 1/0.5m (or 2.00 diopters) would be subtracted from the retinoscope result to obtain the final spherical error.[10]
- Record results as the sphero-cylindrical correction that neutralized the refractive error minus the working distance correction. The first number represents the spherical power in diopters. Plus power indicates hyperopia while minus power indicates myopia. The second and third numbers indicate any astigmatism, with the second number representing the power of the cylinder (note, this can be indicated in plus or minus cylinder form) and the third number representing the axis that the cylinder is neutralized. Finally, if a bifocal is necessary, the additional spherical power will be labeled as “ADD”.[10]
Principles of Dynamic Retinoscopy
Dynamic retinoscopy permits a rapid, objective assessment of a patient’s accommodative ability. Unlike static retinoscopy, accommodation is not relaxed when assessing dynamic retinoscopy nor are lenses used. The goal of this technique is to encourage the patient to use their accommodation to focus on a target in line with the peep hole of the retinoscope.[12]
Dynamic Retinoscopy Technique
Set up
- Seat the patient in the examination chair, in an upright position. The patient should be wearing their appropriate distance optical correction.
- Dim the room lights enough to better see the retinoscopic reflex but to still allow the patient to see the near target. A dim reading light can be used to facilitate viewing of the near target.
- Hold the retinoscope at a reading distance from the patient.
- Hold a near target (small letters or a sticker with small details) in line with the peep hole of the retinoscope.[12]
Examination technique
- Ask the patient to fixate on a distance target.
- Sweep the retinoscope at both 90 and 180 degrees and observe the patient’s retinoscopic reflex. Move back and forth between both eyes. “With” motion should be observed in both eyes. Check both meridians for presence of astigmatism.
- Ask the patient to then fixate on the near target (held at approximately reading distance).
- Repeat the sweep of the retinoscope at both 90 and 180 degrees and observe the patient’s retinoscopic reflex. Move back and forth between both eyes. The previous “with” motion reflex should rapidly change to a slight “against” motion reflex. If this is not observed, encourage the patient to focus on a smaller part of the target or move back slightly yourself.
- Repeat steps 2-4 to ensure accommodation is sustainable for longer periods.[12]
Recording of results
- A normal dynamic retinoscopy response (a slight with motion when fixating at distance that changes to a slight against motion when fixating at a near target) can be documented as “rapid, complete, and steady OU”[14]
- An abnormal response (eg. large against motion, a dull retinoscopic reflex, with motion, or differing reflexes across axes when fixating at the near target) can be documented as “incomplete, sluggish, accommodative lag, momentary accommodation only, or asymmetric in X axes”.[14]
- Note: If the retinoscopic reflex varies across two axes, this is indicative of significant astigmatism. If the reflex is different between the eyes, this is indicative of significant anisometropia.[12]
Risks/Benefits
There are minimal risks associated with retinoscopy. Patients with photosensitivity may have low tolerance for the exam, though the exam is often done quickly and should be tolerable to most. In cycloplegic retinoscopy, patients may temporarily experience symptoms of blurred vision and photophobia. Allergic reactions to cycloplegic agents are rare.
Limitations and Alternatives
A major disadvantage of retinoscopy is that it is a complex skill that typically requires several years of training to develop proficiency.[2][4] An alternative technique for objective evaluation of refraction is autorefraction. Autorefraction utilizes a computerized device to determine refractive error. This method requires the patient sit still looking at an image for several seconds and may be challenging, especially for young children. Autorefractors also provide a less accurate assessment of refractive error and are notably much more expensive than the tools required for retinoscopy.[15]
Educational Resources
1. AAO Retinoscopy simulator: https://www.aao.org/education/interactive-tool/retinoscopy-simulator
References
- ↑ American Association for Pediatric Ophthalmology and Strabismus. Retinoscopy. https://aapos.org/glossary/retinoscopy Accessed August 1, 2023.
- ↑ 2.0 2.1 Hollis J, Allen PM, Heywood J. Learning retinoscopy: A journey through problem space. Ophthalmic and Physiological Optics 2022;42:940–947.
- ↑ American Association for Pediatric Ophthalmology and Strabismus. Retinoscopy. https://aapos.org/glossary/retinoscopy Accessed August 1, 2023.
- ↑ 4.0 4.1 4.2 4.3 4.4 Elliott DB. Clinical procedures in primary eye care E-Book. Elsevier Health Sciences; 2020.
- ↑ 5.0 5.1 5.2 5.3 5.4 5.5 Corboy JM. The retinoscopy book: an introductory manual for eye care professionals. Slack Incorporated; 2003.
- ↑ 6.0 6.1 6.2 6.3 6.4 6.5 6.6 Cassin B. Fundamentals for ophthalmic technical personnel. 1995.
- ↑ Cordero I. Understanding and looking after a retinoscope and trial lens set. Community Eye Health J 2017;30:40.
- ↑ Cassin B. Fundamentals for ophthalmic technical personnel. 1995.
- ↑ Cassin B. Fundamentals for ophthalmic technical personnel. 1995.
- ↑ 10.0 10.1 10.2 American Academy of Ophthalmology. Retinoscopy 101. https://www.aao.org/young-ophthalmologists/yo-info/article/retinoscopy-101. Accessed July 5, 2023.
- ↑ Moran CORE. Objective Refraction Techniques: Retinoscopy. https://morancore.utah.edu/section-03-clinical-optics/objective-refraction-techniques-retinoscopy/. Accessed July 5, 2023.
- ↑ 12.0 12.1 12.2 12.3 Hunter DG. Dynamic retinoscopy: The missing data. Surv Ophthalmol 2001;46.
- ↑ Cassin B. Fundamentals for ophthalmic technical personnel. 1995.
- ↑ 14.0 14.1 Hunter DG. Dynamic retinoscopy: The missing data. Surv Ophthalmol 2001;270.
- ↑ Akil H, Keskin S, Çavdarli C. Comparison of the refractive measurements with hand-held autorefractometer, table-mounted autorefractometer and cycloplegic retinoscopy in children. Korean Journal of Ophthalmology 2015;29:178–184.


